Gaussmeters and Hall Probes
Buy Gaussmeters and Hall Probes online with Bunting - eMagnets™
A Gaussmeter is used to measure the magnetic field strength (magnetic flux density).

Buy Gaussmeters and Hall Probes online with Bunting – eMagnets™
A Gaussmeter is used to measure the magnetic field strength (magnetic flux density). The units of measurement are usually Tesla or Gauss (A/m and Oersted can also be used). Gaussmeters tend to consist of a Hall Effect device within a probe and the voltage output is converted to the magnetic field strength value that the Hall Effect device is being exposed to.
The Transverse Hall Probe is a long thin probe (rectangular in section) with the Hall Effect device at the end of the probe. It measures the field in the axis of the thinnest dimension of the probe (i.e. perpendicular to the main length of the probe. It is ideal for placing within small gaps to measure the fields in e.g. speaker assemblies, etc. For note, the field can be measured with either face of the Transverse Hall Probe (one face is usually marked to indicate the side giving a positive value from a North face which also allows for repeatability in measuring). Transverse Hall Probes tend to have a slight difference in magnitude of measured value depending on which face is used because the active element of the Hall Effect device is not quite central to the thickness of the probe resulting in element being nearer to the field source on one side of the probe than the other (it is not an issue for most applications and can be compensated for when more accurate measurements are needed).
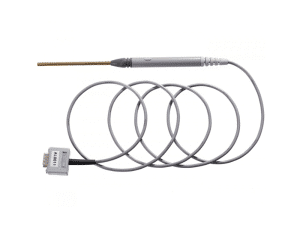
The Axial Hall Probe only has a single method of measuring a magnetic field strength. The probe is at the end of a cylinder and it measures the field in the axis of the cylinder. The probe is not at the exact end of the probe so the measurement has a distance offset to be compensated for (like the Transverse probes).
Like with Transverse probes, X-ray scans can reveal the location of the active element in the Axial Hall Probe for improving accuracy.
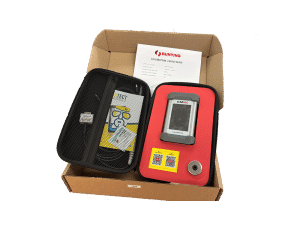
We offer a range of high quality Gaussmeters and probes for professional measurement taking. All are fully calibrated and are supplied in hard plastic protective casings with complete instructions and the calibration certification included.
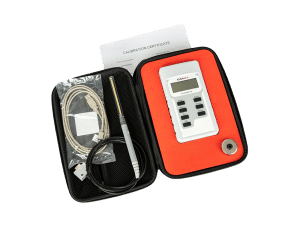
The GM07 Gaussmeter is a Hand Held Gaussmeter calibrated to standards traceable to the National Physical Laboratories (London, UK). It comes with auto and manual ranging and auto and manual power-down. It measures DC, DC Peak, AC RMS, AC RMS MAX and AC Peak fields. It has four ranges:- 0-3 Tesla, 0-299.9 mT, 0-29.99 mT and 0-2.999 mT (measurement units available are Tesla, Gauss, Amps/m and Oersted). It is supplied with a TP002 Transverse Hall Probe (with hold button), a Zero Flux Can and case (four 1.5V AA batteries are not included). Accuracy is better than ±1% Probe and Gaussmeter (NPL Traceable). Reproducibility is ±0.5%. The temperature coefficient is better than ±0.1 % of reading/°C including probe. The product is supplied with a Calibration Certificate and Instruction Manual and is supplied within a Hard plastic carrying case. Please allow up to 2-3 weeks for delivery for this item (other parts ordered will be shipped separately).
The GM08 Gaussmeter is a Hand Held Gaussmeter calibrated to standards traceable to the National Physical Laboratories (London, UK) with RS232 and USB communications and memory storage. An uncorrected analogue output (-3V to +3V) is also provided. It comes with auto and manual ranging and auto and manual power-down. It measures DC, DC Peak, AC RMS, AC RMS MAX and AC Peak fields. It has four ranges:- 0-3 Tesla, 0-299.9 mT, 0-29.99 mT and 0-2.999 mT (measurement units available are Tesla, Gauss, Amps/m and Oersted). It is supplied with a TP002 Transverse Hall Probe (with hold button), a Zero Flux Can and case (four 1.5V AA batteries are not included). Where individual measurements need to be recorded the GMO8 will store (up to 100 values) and upload not only the measured values, polarity, measurement units and measurement function, but also the time at which the measurement was taken. Windows communication software is supplied with the GMO8. This allows the user to download readings, stored data and control the instrument remotely via USB or RS232 interfaces. Data can be downloaded to Excel or OpenOffice spreadsheets or to a CSV format file. Accuracy is better than ±1% Probe and Gaussmeter (NPL Traceable). Reproducibility is ±0.5%. The temperature coefficient is better than ±0.1 % of reading/°C including probe. The product is supplied with a Calibration Certificate, Instruction Manual, USB lead, RS232 lead, analogue adaptor to allow BNC connections and a software disc – all within a Hard plastic carrying case. Please allow up to 2-3 weeks for delivery for this item (other parts ordered will be shipped separately).
The AP002 Axial Hall Probe is suitable for use with the GM07/GM08 Hand Held Gaussmeters. It is fully interchangeable with the GM07/GM08 Hand Held Gaussmeters. Please allow up to 2-3 weeks for delivery for this item (other parts ordered will be shipped separately).
For note the field strength measured is a function of the angle at which the probe is placed relative to the direction of the field – a cosine error can be accidentally introduced (leading to a measurement that is less than the actual value). This effect applies to both Axial and Transverse Hall Probes. The percentage of total available field measured is given by:- cosine(D°) x 100% where cosine is a trigonometric function, often appearing on calculators as “cos”. If the Hall Element is aligned perfectly (D°=0°), 100% of the available field strength is measured. If the Hall Element is 30° out (D°=30°), 86.6% field strength is measured. If the Hall Element is 60° out (D°=60°), 50% field strength is measured. If the Hall Element is 90° out (D°=90°), 0% field strength is measured.
Axial probes are usually of sturdy design and are hence good for general measurements. Transverse probes are often better for placing onto flat surfaces and can be used to measure in small air gaps but they are less sturdy and can break if handled without care. The choice depends on where the measurements are to be taken – sometimes either can be used.